こんにちは、@kz_moritaです。
iOS 開発をしていると Apple の Developer サイトに Device を登録するかと思いますが、たくさん登録しすぎると管理しきれなくなってくるかと思います。
Devices は csv などで管理することもできるので、Export したいなーと思ったのですが公式ではそのような機能がなさそうだったので、UserScripts を使って抽出してみました。
UserScripts とは
ブラウザの拡張機能をインストールしてページにアクセスしたタイミングで任意のスクリプトを実行できる機能のことです。
ブラウザの拡張機能としては、以下の2つが代表的だと思います。
この記事では、Tampermonkey を使用する前提で説明をしたいと思います。
まずは、簡単な UserScripts を書いてみます。
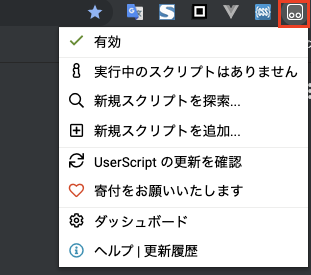
Tampermonkey をインストールすると以下の(赤枠)ような、アイコンが出てきてそれを押すとこのようなメニューが表示されます。
新規スクリプトを追加... を押すと以下のような画面が表示されるかと思います。
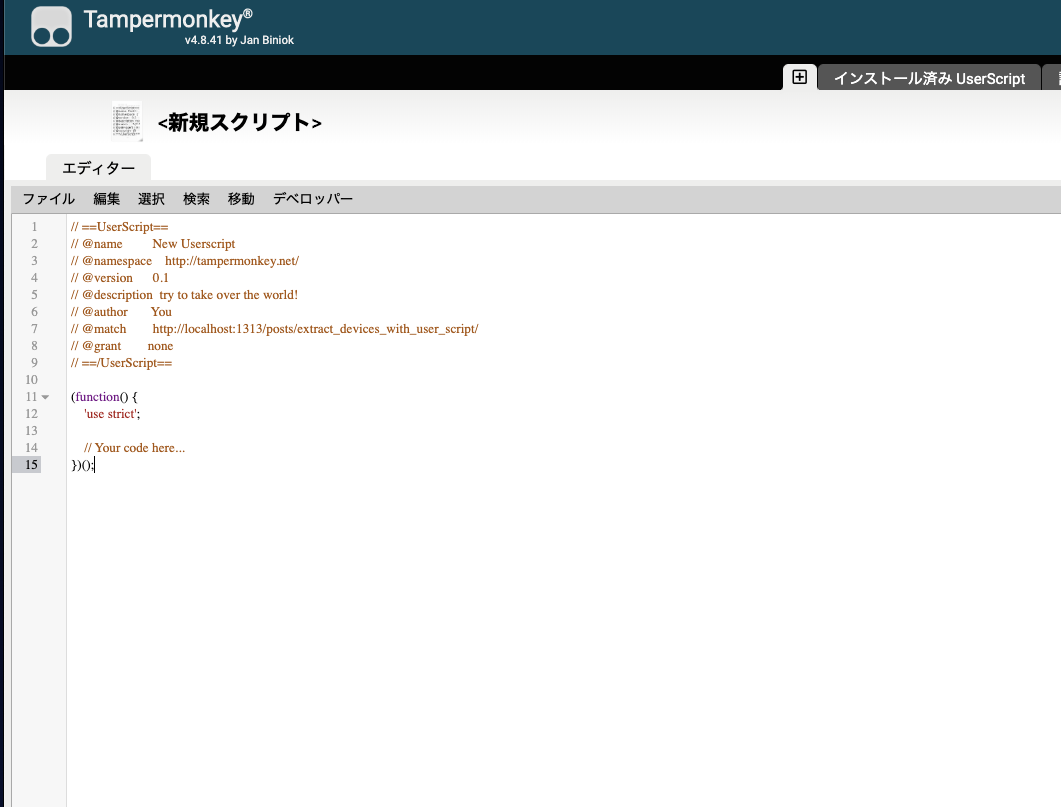
ソースコードは以下のようになっています。
// ==UserScript==
// @name         New Userscript
// @namespace    http://tampermonkey.net/
// @version      0.1
// @description  try to take over the world!
// @author       You
// @match        https://example.com
// @grant        none
// ==/UserScript==

(function() {
  'use strict';

  // Your code here...

})();
ここでは、@match と // Your code here... の箇所に注目します。
@match には、どのサイトにアクセスしたときにスクリプトを発火させるかを指定することができます。
// Your code here... にコードを書くと、@match に一致する URL にアクセスしたときにそのスクリプトを実行することができます。
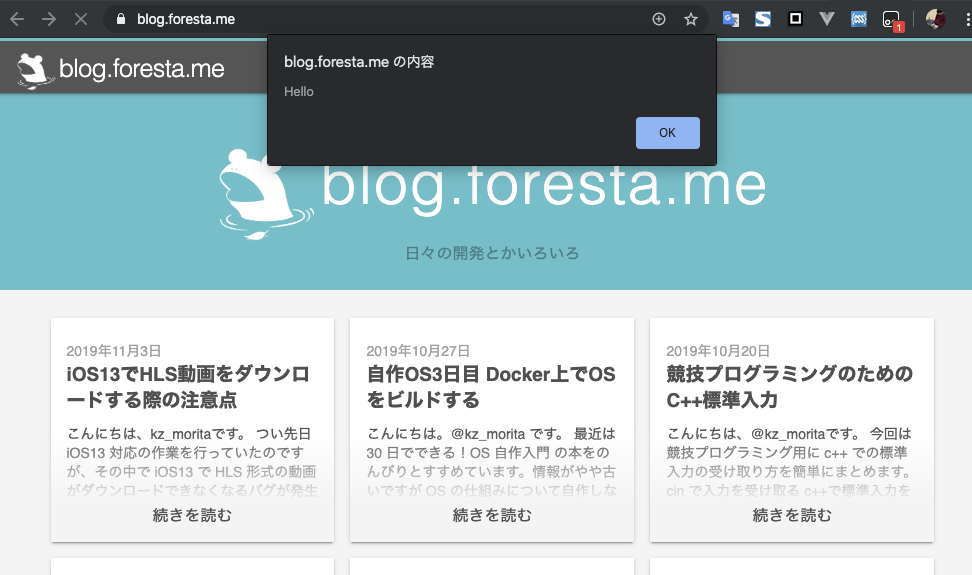
実際に簡単な例として以下のようなコードを登録すると、 https://blog.foresta.me にアクセスしたときに、Hello と alert 表示されるスクリプトを実装することができます。
// ==UserScript==
// @name         New Userscript
// @namespace    http://tampermonkey.net/
// @version      0.1
// @description  try to take over the world!
// @author       You
// @match        https://blog.foresta.me
// @grant        none
// ==/UserScript==

(function() {
  'use strict';

  alert('Hello');
})();
実際にアクセスすると以下のように alert が表示されることが確認できます。
Device 一覧を抽出するスクリプト
今回はこれを用いて、Apple Developer サイトから Device 一覧を CSV として抽出するスクリプトを書いてみましたので紹介します。
// ==UserScript==
// @name         extract_devices
// @namespace    http://tampermonkey.net/
// @version      0.1
// @description  Extract devices info from apple developer site.  https://developer.apple.com/account/resources/devices/list
// @author       kz_morita
// @match        https://developer.apple.com/account/resources/devices/list
// @grant        none
// ==/UserScript==

(function() {
  'use strict';

  setTimeout(function() {
    var button = document.createElement('button');
    button.id = 'action-export';
    button.type = 'button';
    button.className = 'tb-btn--secondary';
    button.innerText = 'Export';
    var actionsContainer = document.querySelector('.actions-container');
    actionsContainer.appendChild(button);

    button.addEventListener('click', function(e) {
      var list = document.querySelector('#infiniteListContainer')
        .firstElementChild.firstElementChild;
      var csv = '';
      for (var child of list.children) {
        csv += Array.prototype.slice
          .call(child.children)
          .map(x => x.innerText)
          .join(',');
        csv += '\n';
      }

      var filename = 'devices.csv';

      var UTF_8_BOM = '%EF%BB%BF';
      var data =
        'data:text/csv;charset=utf-8,' + UTF_8_BOM + encodeURIComponent(csv);

      var element = document.createElement('a');
      element.href = data;
      element.setAttribute('download', filename);
      document.body.appendChild(element);
      element.click();
      document.body.removeChild(element);

      alert('device.csv is downloaded!!');
    });
  }, 1000);
})();
これを登録すると Export ボタンが表示され、それを押すと device の一覧を CSV ファイルでダウンロードすることができます。
まとめ
今回は、User Scripts について簡単に紹介して、Apple から Device 一覧を抽出するスクリプトを紹介しました。
User Scripts 便利!!