こんにちは、 @kz_morita です。
Firebase Auth を用いて、Sign in with Apple の実装をしたのでまとめていきます。
準備
App に Sign in with Apple の Capability を追加
Apple Developer サイトと、Xcode 11 以上で Capability を追加します。
Certificates, Identifiers & Profiles > Identifiers で対象のアプリの APP ID の設定を編集して、Sign in with Apple を有効化します
詳しくは、メルカリさんのテックブログなどを参考にしてみてください。 https://tech.mercari.com/entry/2019/12/11/115331
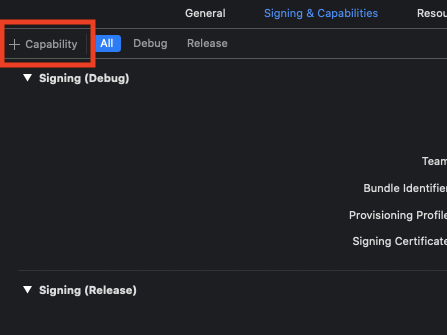
また、Xcode 上でも Capability を追加します。
プロジェクトの設定から、Signing & Capability タブの + Capability を押して Sign in with Apple を追加します。
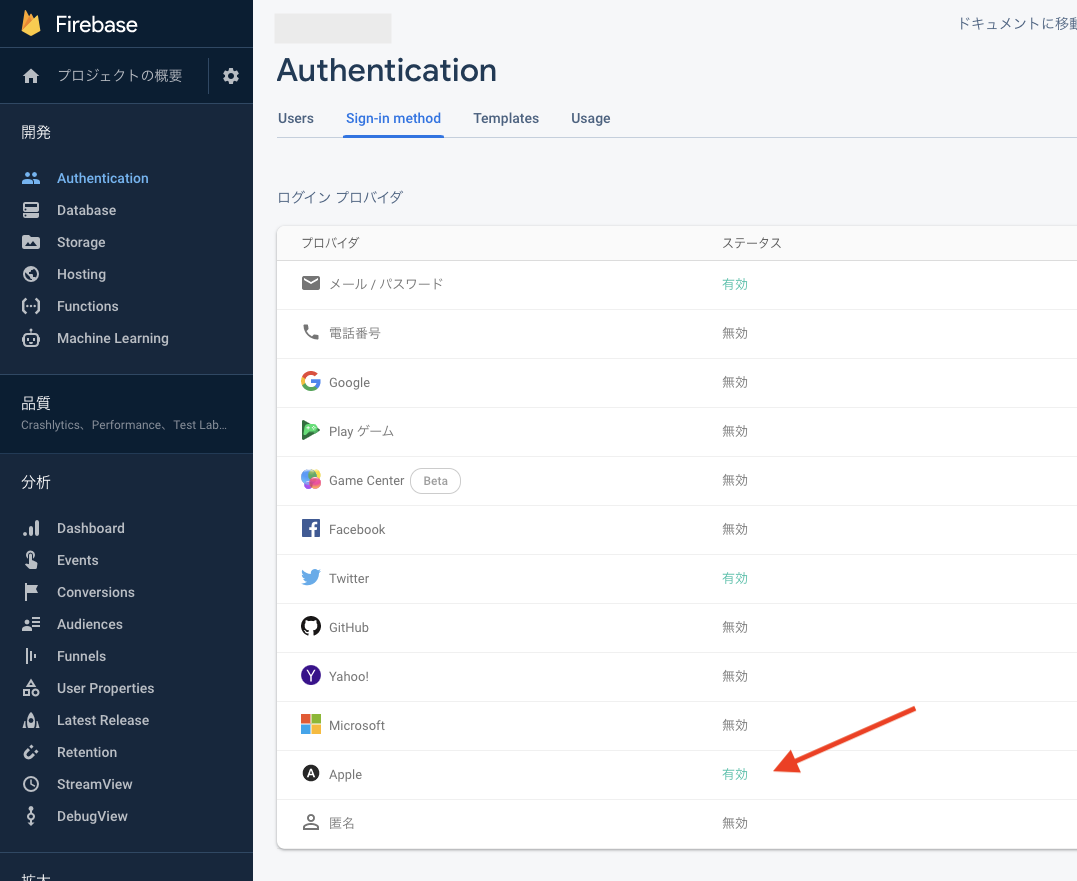
Firebase の Auth に Sign in with Apple を追加
Firebase の設定画面上で Sign in with Apple を有効化します。
ボタンを表示する
ボタンを表示するロジックは以下のようになります。
import AuthenticationServices

// ...
// ..
// .

private func setupAppleLoginButton() {
    guard #available(iOS 13.0, *) else {
        return
    }

    let appleLoginButton = ASAuthorizationAppleIDButton()

    // 高さや Radius などを設定
    appleLoginButton.height = BUTTON_HEIGHT
    appleLoginButton.heightAnchor.constraint(equalToConstant: BUTTON_HEIGHT).isActive = true
    appleLoginButton.cornerRadius = BUTTON_HEIGHT * 0.5

    // タップされた時の処理を実装
    appleLoginButton.addTarget(self, action: #selector(didTapAppleLogin), for: .touchUpInside)

    // View に追加
    self.buttonStackView.insertArrangedSubview(appleLoginButton, at: 0)
}
基本的には、Apple の標準のボタンを使うことになると思います。
ASAuthorizationAppleIDButton を用いて、上記の例では高さや Radius を調整しています。
また、Sign in with Apple は iOS 13 以降をサポートしていますので、guard でチェックを入れています。
今回のアプリでは、Twitter 認証も用意していたので、Twitter 用のボタンと Sign in with Apple のボタンを StackView にいれて並べました。
ボタンは、自前で実装することも可能ですが、ガイドラインが定められているためデザイン上問題がない限りはデフォルトのものを使用していくのが良いかなぁと思います。
認証処理の実装
ボタンがタップされた後の認証処理は以下のような実装になります。
import AuthenticationServices

func authorize(view: UIViewController) {

    // Generate nonce
    let nonce = randomNonceString()
    currentNonce = nonce

    let appleIDProvider = ASAuthorizationAppleIDProvider()
    let request = appleIDProvider.createRequest()
    request.requestedScopes = [.fullName, .email]
    request.nonce = sha256(nonce)

    let authorizationController = ASAuthorizationController(authorizationRequests: [request])
    authorizationController.delegate = view as! ASAuthorizationControllerDelegate
    authorizationController.presentationContextProvider = view as! ASAuthorizationControllerPresentationContextProviding
    authorizationController.performRequests()
}
上記のコードは、Firebase の公式のサンプルを参考にしています。
Firebase Docs - iOS で Apple を使用して認証するsha256 と randomNonceString は以下のような関数です
import CryptoKit

@available(iOS 13, *)
private func sha256(_ input: String) -> String {
    let inputData = Data(input.utf8)
    let hashedData = SHA256.hash(data: inputData)
    let hashString = hashedData.compactMap {
        return String(format: "%02x", $0)
    }.joined()

    return hashString
}

// Adapted from https://auth0.com/docs/api-auth/tutorials/nonce#generate-a-cryptographically-random-nonce
private func randomNonceString(length: Int = 32) -> String {
    precondition(length > 0)
    let charset: Array<Character> = Array("0123456789ABCDEFGHIJKLMNOPQRSTUVXYZabcdefghijklmnopqrstuvwxyz-._")
    var result = ""
    var remainingLength = length

    while remainingLength > 0 {
        let randoms: [UInt8] = (0 ..< 16).map { _ in
            var random: UInt8 = 0
            let errorCode = SecRandomCopyBytes(kSecRandomDefault, 1, &random)
            if errorCode != errSecSuccess {
                fatalError("Unable to generate nonce. SecRandomCopyBytes failed with OSStatus \(errorCode)")
            }
            return random
        }

        randoms.forEach { random in
            if remainingLength == 0 {
                return
            }

            if random < charset.count {
                result.append(charset[Int(random)])
                remainingLength -= 1
            }
        }
    }

    return result
}
上記の処理を実装すると、Apple が提供する UI 上で、Apple ID の認証を行うことができます。
認証が完了すると credential が 取得できるのですが、それをうけとるのが ASAuthorizationControllerDelegate を実装したクラスになります。
authorizationController.delegate = view as! ASAuthorizationControllerDelegate
Delgate を実装したクラスは以下のようになります。
@available(iOS 13.0, *)
extension ViewController: ASAuthorizationControllerDelegate {

    /// - Tag: did_complete_authorization
    func authorizationController(controller: ASAuthorizationController, didCompleteWithAuthorization authorization: ASAuthorization) {
        switch authorization.credential {
        case let appleIDCredential as ASAuthorizationAppleIDCredential:

            // credential が取得できるのでそれを使って、Firebase の認証を行う
        default:
            break
        }
    }


    /// - Tag: did_complete_error
    func authorizationController(controller: ASAuthorizationController, didCompleteWithError error: Error) {
        // Handle error.
    }
}
また、Sign in with Apple の UI を表示する window を指定する以下も実装する必要があります。
上記のコードで言う以下の部分です。
authorizationController.presentationContextProvider = view as! ASAuthorizationControllerPresentationContextProviding
実装したクラスは以下のようになります。
@available(iOS 13.0, *)
extension ViewController: ASAuthorizationControllerPresentationContextProviding {
    /// - Tag: provide_presentation_anchor
    func presentationAnchor(for controller: ASAuthorizationController) -> ASPresentationAnchor {
        return self.view.window!
    }
}
Firebase Auth
ここまでで、取得できた credential を用いて、Firabase の singin を行っていきます。
まず、Apple の credential から Firebase の credential を作成します.
第一引数の providerID は "apple.com" を指定します。第二引数は、Apple の Authorize で取得した Token から取得したものになります。
第三引数の rawNonce は randomNonceString で生成して、sha256 でハッシュ化する前の nonce を指定します。
let credential = OAuthProvider.credential(
    withProviderID: "apple.com",
    idToken: appleIDCredential.identityToken,
    rawNonce: rawNonce)
最後に上記で生成した、credential を使用して認証をします。
Auth.auth().signIn(with: firebaseCredential) { (authResult, error) in
  //
}
これで、Firebase と Sign in with Apple を用いた認証が実現できるかと思います。
まとめ
今回は、Sign in with Apple と Firebase を用いて認証機能を作るところをまとめました。作業として若干手間でありつつもそんなに難しくはなかったという印象です。 このあたりの作業は、アプリを作るたびにやる可能性があるもの (ドメインロジックじゃない) なので、できるだけパパッとスムーズに作れるようになれると良いなぁと思います。